Manage Textures
After uploading your first textures, you can start organizing them within the virtual catalog.
Note: Currently, only JPEG, PNG, and TIF file formats are supported.
Inside XSMP Textures Manager, you can manage virtual folders and textures using a simple drag-and-drop interface.
- To move a single texture, simply drag it to the desired folder.
- To move multiple textures at once, select the items using the checkboxes available on the thumbnails, and all selected items will be moved to the chosen folder.
Textures from XSMP can be added to the Compact Material Editor (active slot) or the Slate Material Editor by pressing the corresponding button, toggling the adjacent option, or using the context menu on the texture thumbnail (right-click).
When sending a texture to the Material Editor, the appropriate bitmap loader (based on the currently active render engine) will be automatically generated. Currently supported loaders include CoronaBitmap, VRayBitmap, RS_Bitmap, and BitmapTexture (the latter will be created if the render engine is not recognized).
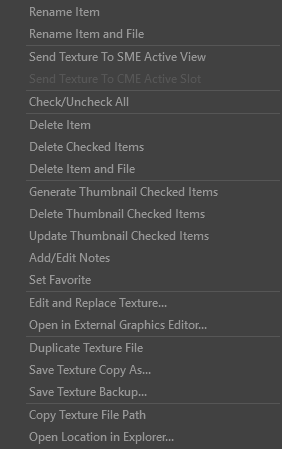
Context Menu for Texture Elements
- Rename Item - Renames only the texture item in the library.
- Rename Item and File - Renames both the texture item and its associated texture file.
- Send Texture To SME Active View - Sends the texture file with the appropriate loader to the active view in Slate Material Editor, when using Slate (Advanced) ME in 3ds Max.
- Send Texture To CME Active Slot - Sends the texture file with the appropriate loader to the active slot in Compact Material Editor, when Compact ME is active in 3ds Max. Caution: This will overwrite the material in the active slot with the texture.
- Check/Uncheck All - Selects or deselects all texture items within the same folder.
- Delete Item - Deletes the selected texture item from the library.
- Delete Checked Items - Deletes all checked items within the current folder.
- Delete Item and File - Deletes both the selected item and its associated texture file.
- Generate Thumbnail for Checked Items - Generates thumbnails for all checked items. It is not recommended to select a large number of items at once; processing 5–10 items per session is optimal.
- Delete Thumbnail for Checked Items - Deletes the existing thumbnails for all selected items.
- Update Thumbnail for Checked Items - Deletes the existing thumbnail and generates a new one for all checked items. Useful if the texture file has been edited in an external graphics editor.
- Add/Edit Notes - Allows adding or editing notes for the texture. Notes are visible at the bottom of the XSMP gallery when the gallery view mode is set to Tiles. In List view mode, notes are displayed next to the corresponding item's thumbnail.
- Set Favorite - Marks the texture as a favorite. A star icon will be displayed on the thumbnail.
- Edit and Replace Texture... - Opens a dialog allowing the creation of a texture copy: resizing, converting to grayscale, and replacing the original file in the scene (if the original is in use).
- Open in External Graphics Editor... - Opens the external graphics editor specified in XSMP Settings > Textures and loads the texture file associated with the selected item.
- Duplicate Texture File - Creates a duplicate of the texture file (with the
_copysuffix) in the same directory as the original file. The duplicate is automatically added to the XSMP library in the same folder as the original. - Save Texture Copy As... - Allows creating a copy of the texture file in a user-specified location with a custom name. The copy is also automatically added to the library.
- Save Texture Backup - Allows creating a copy of the texture file in a user-specified location with a custom name. The backup copy is not added to the library.
- Copy Texture File Path - Copies the path of the texture file associated with the item. Useful for replacing a file path in an existing loader by pasting it into the corresponding field.
- Open Location in Explorer - Opens the directory containing the texture file in Windows Explorer.


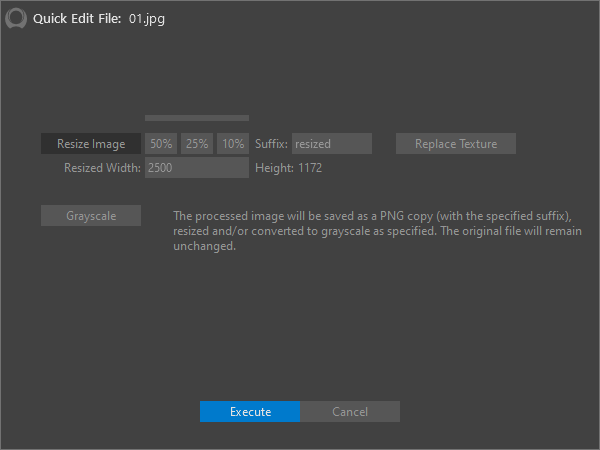
Quick Edit File Dialog
The dialog is accessed via the texture item's context menu option Edit and Replace Texture...
This tool allows resizing the image file, converting it to grayscale, and replacing the texture file in the scene's material with a copy created using the suffix specified in the respective dialog field.
You can resize the image (or keep its original dimensions) and convert it to grayscale independently. The Execute and Replace Texture options are active when at least one function (Rescale and/or Grayscale) is enabled. As with all file operations in XSMP Texture Manager, only JPEG, PNG, and TIF formats are currently supported. The copy will always be saved in the lossless PNG format.
The Replace Texture operation will be performed only if Texture Manager detects an existing file in the 3ds Max scene that matches the file path of the selected texture item.
Note: If the scene contains multiple materials using the texture associated with the selected item, the file will be replaced across all of them. Therefore, this option should be used cautiously and thoughtfully. When you only need to replace the texture file in one or a few materials where the texture is used, it is safer to create a resized and/or grayscale copy, and then use the new item's context menu option Copy Texture File Path to copy the file path. You can then paste this path into the desired material's loader manually.
