Create New Textures Library
You only need to create an empty directory anywhere on your computer, specify it when creating a new Library, and the database will be automatically prepared by the XSMP Textures Manager.
The number of Libraries you can create is unlimited, allowing you to organize them separately for large projects or as specialized profiles, e.g., "Wood-Oak," "Wood-Oak Parquet," "Metal-Various Bronze," etc.
No texture file copies or textures themselves are stored within the Library directory. The directory contains only a database with information about texture files and cached thumbnails for visual reference.
All Libraries are completely independent of each other. The path to the main Library directory will be added to the configuration file by XSMP, which is located at:C:UsersUSERNAMEAppDataRoamingSiger StudioXSMPmax.
- Create a directory on your local or network drive and use the "+" button to specify the path to it.
The first (root) directory is now added. By default it is named "New Library" and you can add as many categories/folders as you like. - Select the newly created library from the drop-down list. It will automatically be named "New Library".
Important! Each library must have a unique name, so rename it immediately. In the tree, select a recently created directory and press F2 or open the context menu (right-click) and select the "Rename" item. - The root library directory cannot contain textures. This requires the creation of a new Category or Folder: both types of catalogs can have sub-categories, sub-folders and textures. Directories are divided into types for convenience only.
There is no limit to the depth of the library tree, but it is recommended not to exceed 5-7 folders. Directories can be rearranged by simple drag-drop.
Adding Textures
After creating the initial folder structure (which can always be modified, rearranged, deleted, or expanded), you can start uploading your first textures. However, before proceeding, it is strongly recommended to review the TEXTURES category settings in the XSMP Settings.
Important! Avoid adding more than 10–20 textures to a category or folder at once. For very large files (8K and above), upload even fewer textures at a time. When adding a large number of textures simultaneously, XSMP will need to generate thumbnails for each (if automatic thumbnail generation is enabled in the settings) and add them to the database. This process can be time-consuming. You can significantly speed up the workflow by uploading smaller batches at a time.
Additionally, it is not recommended to store an extremely large number of textures in a single virtual folder, as this may impact performance and responsiveness.
Disabling automatic thumbnail generation temporarily can speed up the texture addition process. Thumbnails can be generated later directly within the catalog.
Important! Texture files themselves remain in their original location and are not moved to the library directory. The library directory contains only the database and cached thumbnails. However, certain file operations are possible directly through the XSMP Textures Manager, such as deleting, copying, duplicating, minimal editing, and sending files to your preferred graphic editor.

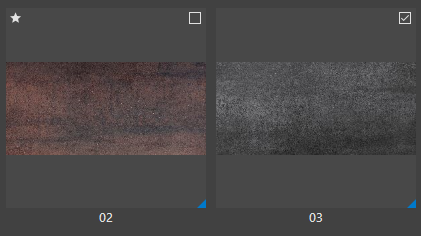
Icons in Thumbnails
- A star indicates that the texture is marked as a favorite.
- A checkbox is enabled when you want to select multiple items. Other methods of selecting multiple items are not available.
- A small blue triangle in the bottom-right corner indicates that the texture is detected in the 3ds Max scene (when automatic detection is enabled in XSMP Settings).
